Pattern Drafting 101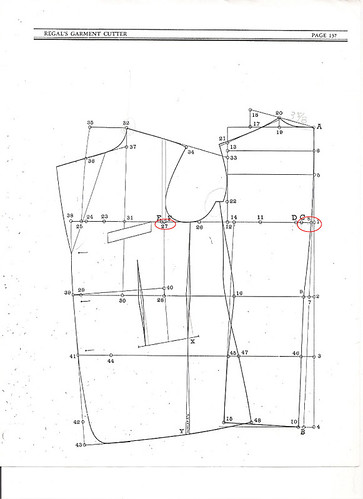
There are a number of people who have expressed interest in learning how to draft suit patterns and are looking for a good text. While there are a number of (mostly out of print) texts on cutting (or drafting, I use these terms interchangeably) they all assume that the reader has spent the usual 8 years apprenticeship and is familiar with the rudiments. Of course, the best way to learn is to be taught, but there are those for whom this may not be easy so I will try to condense some of the basics in order to get you started.
DRAFTING SQUARE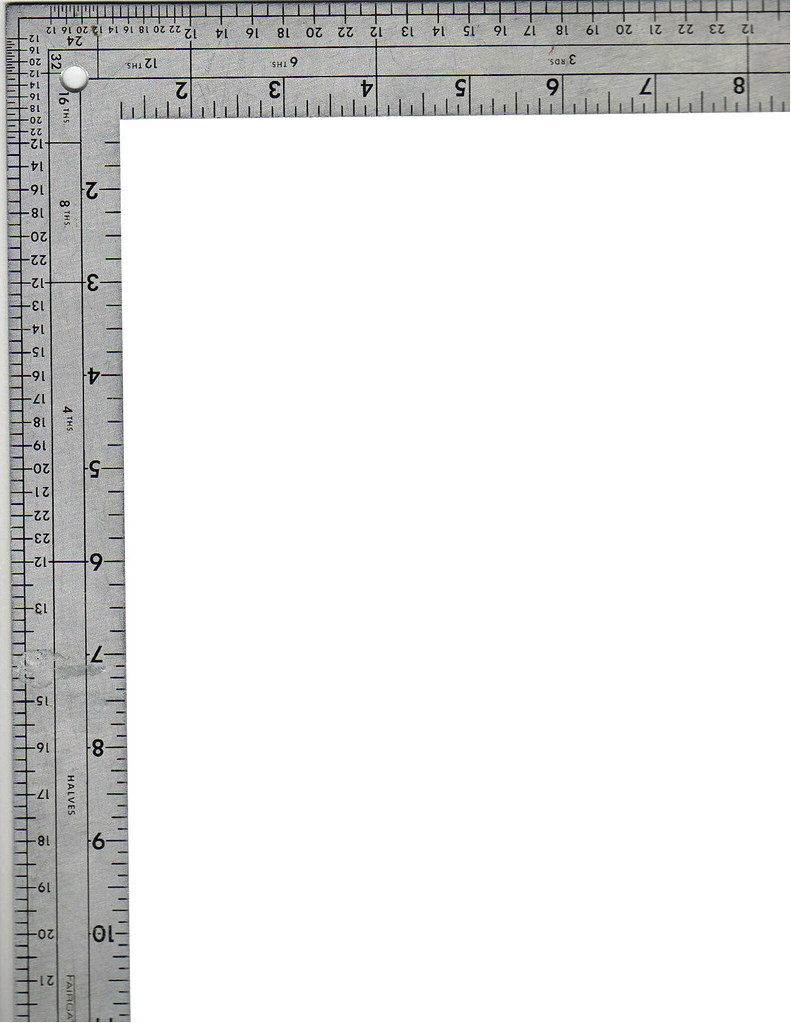
The first thing you need is a drafting square. There are enough things to get your head around at first; don’t get tripped up by fractional divisions- get yourself a drafting square which will do part of the work for you. A list of sources can be found here.
The squares are available in centimeters or in inches and the one you choose should reflect the sizing norms that you are used to and will use. Most English language cutting manuals use inches as a basic unit so even though you may find the system archaic (we tailors love archaic stuff) you will probably be best off using a ruler set in inches. French, Italian and German manuals tend to be in centimeters, which is more civilized.
On one side of the square you will see boxes with numbers on them- they are grouped into divisions such as thirds, fourths, sixths, eighths, etc. More on this later, though this is very important, especially when you are starting out.
THE SYSTEM
There are a number of drafting systems published and you should choose one to learn at first, and choose carefully. Some systems were developed with the individual cutter in mind, that is to say, the bespoke cutter who would be cutting one at a time for individual customers, and others which were more geared toward wholesale (these are more rare). The bespoke systems had only side seam allowances included since inlays were added at the time of cutting , whereas wholesale systems have all seam allowances included. When starting out, it is important to find a complete text, not just individual draft instruction pages, since the instructions will not give important details such as which, if any, seams have been allowed. If you are unable to find the complete text, find out from someone familiar with it what seams were included and what inlays, if any, must be added.
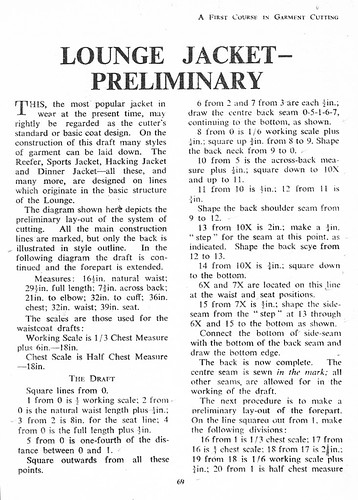
Another thing to take into consideration is the type of construction lines. Some systems, like the one pictured above which is from Regal’s American Garment Cutter, will have you draft you pieces in such a manner which will require straightening after drafting- bespoke systems were usually such that you could draft directly onto the cloth and as such the basic construction lines will be the same as the grain lines and are easier for the beginner to grasp. Regal’s, Rundschau, the Modern Mitchell System are all excellent systems but a little complex for the starting cutter. The Cutter’s Practical Guide system as published by A. Whife, is a good system for beginners, however it is out of print and sometimes hard to find complete copies. The Tailor and Cutter magazine and the Modern Tailor Outfitter and Clothier (a rare and expensive 3-volume manual) are good sources. Many individual drafts can also be found at the Cutter and Tailor forum, as well as people who may be able to help you start out.
Most seam allowances at the time were of ¼”- today 3/8” is more common, and home sewing patterns allow 5/8”.
THE SCALE
Drafting and grading were based on the premise that one could predict the dimensions of the various parts of the body based on certain landmarks, a premise which is now under scrutiny and debate. It was also important that the system be easy to remember by the cutter so system of proportional cutting were devised around a scale.
Usually the scale is equal to half the breast measure; for a breast measuring 40 inches around, the scale would be 20 inches. In European systems, the size is equal to the scale; a person with a 100 cm breast wears a size 50 jacket and the working scale is 50 cm. Some systems use a “scale” and a “working scale”, which may be something like one third of the breast plus 3 or six inches. The instructions will always indicate the scale. They will also indicate the base size used for the draft- for example they may state the scale is half the breast, in this instance 20”. Some direct measures will be used, such as waist length and full length, perhaps armscye depth and front shoulder measurements; the instructions will also state what these are FOR THE SIZE BEING USED IN THE INSTRUCTIONS. If you are drafting in the same size as the instructions, you can use these direct measures. If you are drafting in another size you must use the corresponding direct measures which can be found in the book’s table of standard measurements (if it includes one) or from the client. Since you will not be cutting for clients for a good while, I suggest you stick with the numbers in the book. It is easier to check your mistakes if you do (and you WILL make many mistakes, at first).
The points of the grid of the draft are located using divisions of the scale- for example, the first neck point is usually somewhere around one sixth of the scale from the first point of the draft. This is where the drafting square becomes useful- if you are required to start calculating one sixth of 19 5/8” you are very likely to make mistakes. Instead, locate the scale amount on the sixths divisions of the square. In other words, if your breast circumference is 40, the scale is 20 (half the breast). You will locate 20 in the sixths division portion of the drafting square and locate your point this way without having to do any math. Suddenly the expense seems worth it, no?
THE INSTRUCTIONS
I have found that many instructions are a little loose in their wording (and sometimes include mistakes) so you need to use some common sense at times. While normally we are working with the half breast and half waist measures (or breast on division, as some state) they will sometimes refer to the “breast” or “waist”, not being entirely clear whether it is the full breast or the half breast. You must use a little common sense before applying the measurement to be sure which one they meant.
Many systems also take for granted that you know how to “sweep” a measure, how to apply a measure, and they maddeningly refer to “and develop in the usual way” without mention of what that usual way is.
To sweep a measure, usually when locating the neck point on the forepart, place one end of the square at the pivot point which will be indicated, place a pencil at the indicated measurement, and draw an arc. If you have a very large compass, this would be more precise. For example, if using a strap measurement to find the neck point, you place one end of the ruler at the front breast line near the armhole, find your strap measurement (say 12”) on the ruler, and keeping your pencil at 12” you sweep an arc. You will then place your ruler at the center front and sweep another arc, perhaps this time at 13” (the instructions will indicate what measurement to use)- the intersection of these points is your neck point.
Darts, vees and fishes are usually pretty loosely indicated in the drafts as it is assumed that you know how to locate and deal with them; some are more precise than others and you will eventually come to realize that it is largely a stylistic issue that is open to a lot of personal interpretation.
Many systems include (sometimes cryptic) references to making up, such as the need to full in, hold short, or stretch certain areas, or to the manipulations required, and in these cases, a good understanding of making up is really required to completely grasp the meaning. Keep in mind that before one started an apprenticeship as a cutter one had to have completed one’s tailoring apprenticeship.
LATHER, RINSE, REPEAT
AKA Practice, practice, practice.
This is a page from a student’s half-scale practice book from the Scuola Artistica di Taglio, Napoli. It is a good idea to start working in half-scale since you waste less paper and is easier to see your entire draft at once. Half scale drafting rulers are available for this purpose.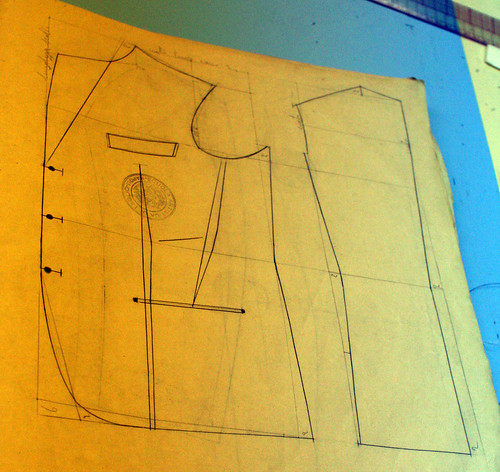
Most of the draft will seem cryptic at first to you. Some may seem like rocket science or advanced trigonometry and you will miss a lot of the subtleties of certain points and calculations at first. You will also make a lot of mistakes. Keep your work to refer back to later. Practice, practice, practice. If you can, work through all the drafts in the manual, then come back and start over again. Many of the little points you missed at first may be more clear now. I will keep updating this page as things occur to me (as the coffee kicks in) so check back here from time to time as well.
Good luck!
EDIT
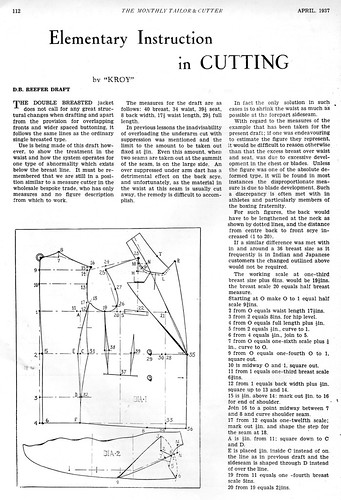
Thank you for your comments, Kathleen. I agree that the proportional systems are very limited, particularly where oversizes are concerned. The drafting systems that I refer to are all older systems but are still in use in men's tailored clothing, both in bespoke and in RTW. I have included pages from three different publications which explain that the scales being used are half the chest and a working scale of half chest plus a certain amount. Length measures in tailored clothing are usually done with direct measure instead of scale, which is why the height is not incorporated into the scale for these systems, only the chest width. In Italy, the drafting systems for men most often use the size as the scale, and we know that the size is equal to half the breast measure.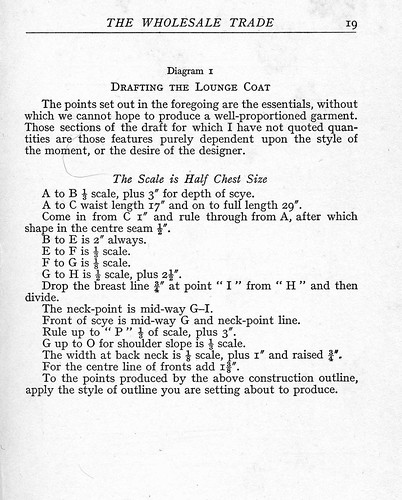


16 comments:
Thanks Jeff. Here's a web address that posts some of the pages of The Cutter's Pratical Guide. The copyright seems to have expired, so the pages may be able to be downloaded. Or, just Google the title of the book, and click on the first listing. http://www.costumes.org/HISTORY/100Pages/1893to1898cuttersguide.htm
Brilliant post. I have been reading the posts on Cutter and Tailor and this is very helpful, too.
Thanks.
Your blog is great.
After reading the Jacket Project(From TCAT), my head was spinning after having a year's tuition in Pattern Making/Sewing - Using basic patterns and manipulating them.
Thanks, you spread some light onto pattern systems.
Ive been a follower for some time now, and slowly understanding more of your indept posts :D
Does anyone know of a good system for cutting bespoke ladies trousers? I'm desperately searching and so far have found nothing...
fantastic blog by the way :)
I've been drafting to scale for over ten years, it's a workable intuitive system best suited for bodies that are relatively hgt/wgt proportionate. More specifically, it doesn't work well for outsizes (plus sizes in the US).
However, I have never come across scale's definition as being limited to "half the breast measure". Any instruction I've seen (and used) incorporated height into the formula too. See Morris, his book is accessible on the web. The use of the scale on the L-square works well either way, being nothing but a chart of aliquot parts at the ready.
There's a baseline to the scale system, adjusted up and down from there. For men, the baseline is a man with 38 chest, hgt 5'8". The scale for this figure evenly works out to half the breast measure. However, for every inch increase in hgt, the scale increases by 1. The same concept applies to girth. Also, this doesn't work as well for women's figures if they have some sort of inordinate chest measure (large bust but are very thin).
That scale doesn't evenly amount to half the breast measure was what contributed to confusion in retail sizing (in the old days). If it were a simple matter of doubling the size (half the breast), it would have been easy to discern one's size.
One thing I would like to see spelled out in a list, are the scale or breast (not the same thing) proportions as applied to areas of the body. For example, neck measures typically constitute 1/6 of breast. Depending on the design but suits generally, chest back is 3/8 of breast, the front being 5/8 -altho a friend recently mentioned that the divisions are broken into 7ths in Australia (3/7 to back, 4/7 to front).
Hi, thanks for the info! Would you have any links to drafting books for women? I've taken a couple of weekend tailoring classes but they've been menswear classes. I'd really like to know how to draft a jacket for myself.
I really enjoy your blog.
THank you, AB.
I don't know of any good ladies' drafting books or sites, though I imagine there must be many. Personally, I prefer to drape my ladies' patterns.
Good luck!
J
Thanks for this excellent blog. It's the most complete source of information on tailoring I've found so far. I'm trying to learn the craft and I want to begin practicing, but where can I get (lots of) the blank pattern paper such as in the photo here?
Fred
Fred
Art supply stores and drafting supply stores will have rolls of drafting paper which is useful for practicing in half-scale.
best
J
Just wanted to thank you for the remarks and clarification on Scale and Working Scale! It really helped me just now as I was drafting these sleeves I'm working on!
Thanks for the response, very belatedly. :-)
Is it possible to have the scan of the "Scuola Artistica di taglio"'s book? I believe it's almost impossible to find!!
my mail: kantor.tadeusz@email.it
For drafting patterns I prefer to use autocad instead of doing it by hand. Autocad allows for a great range of manipulation, accuracy, and there are no eraser marks!
Thank you so much, God bless you.
This pattern drafting tutorial is superb! The clear instructions and helpful tips make it easy to follow and learn. I’m excited to try drafting my own patterns now. Thanks for sharing!
Sexy Black Jumpsuits
Post a Comment