Showing posts with label pagoda shoulders. Show all posts

Saturday, February 12, 2011

Despos

Despos04

In the world of tailored clothing, there are houses that are, in my opinion, seriously overhyped, and others who deserve a lot more attention than they get. Chris Despos falls into the latter category.

Based now in Chicago, Chris once operated out of Dallas, a city he frequently travels to, in addition to others, so if you are looking for one of the country's (perhaps one of the world's) top tailors outside of the Manhattan area, you can find him in his Oak Street studio.

Many thanks to Chris for donating this suit to science.


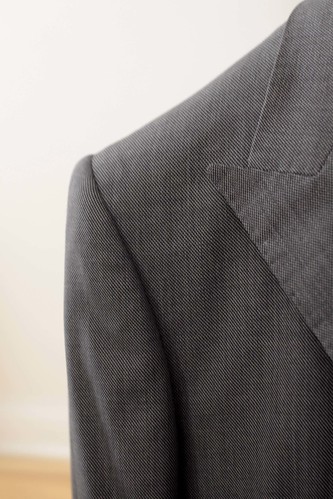
One of the first things that sets my bells ringing is this shoulder.
Despos06

Though currently out of favor but perhaps enjoying a return of sorts, one of the reason that this type of pagoda-shaped shoulder is not so commonly seen is that it represents the pinnacle in terms of difficulty of execution. In other words, it may look odd to many people because they are not used to seeing it because so few can do it right. This kind of shoulder goes beyond just aesthetics- it is actually made to conform more naturally to the actual shape and forward pitch of the human shoulder, and there is a great 3-dimensionality to it. In movie terms, this shoulder is the Avatar to so many Creatures From The Blue Lagoon. You'll be able to see what I mean a bit later in the post.

This suit was made back in 1992 but as we saw in a previous post, has held up really well despite its being made in a super 150s cloth. Chris will be annoyed with me when he sees that the coat has been sitting in a heap since my last post and is thus in need of a pressing, but another annoyed reader commented that they wanted to see more of the garments than just the guts.

Despos01

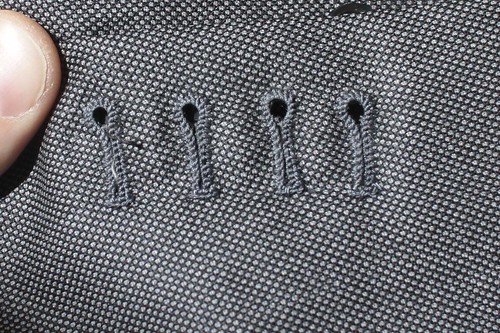
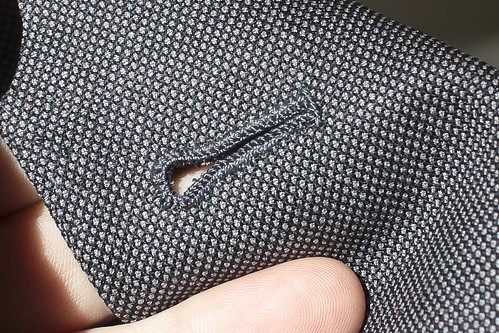
Some buttonhole porn, for those who are into that. These buttonholes are gimped with a single strand of buttonhole twist, instead of the type of gimp I use, so readers who are experimenting with buttonholes and don't have access to the Agreman gimp, here is proof that you can get perfectly good results without it.

Despos02

Despos03

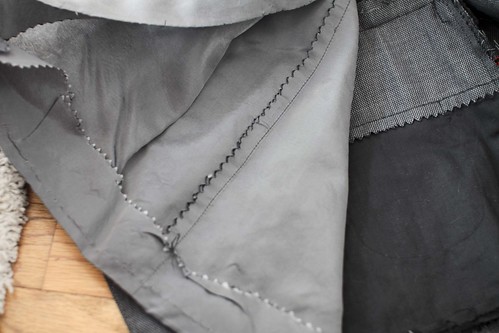
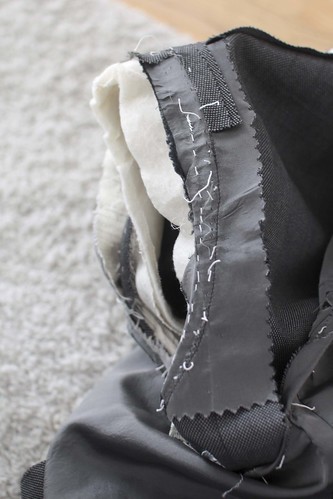
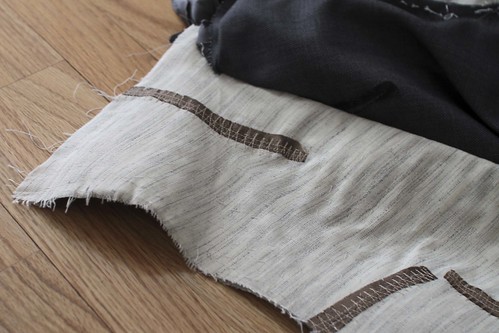
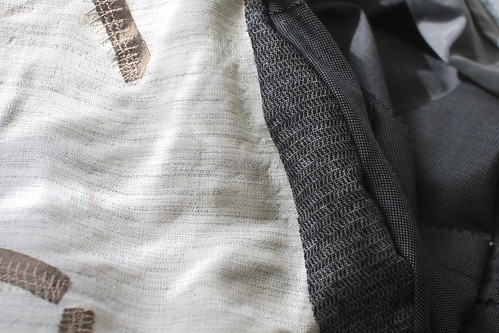
Here's something we don't see all that often anymore; the outlets and cut edges have all been pinked (cut in a zig-zag edge). This prevent the edges from fraying, especially the lining which can get really messy, and may also help to prevent seam impressions.

Despos05


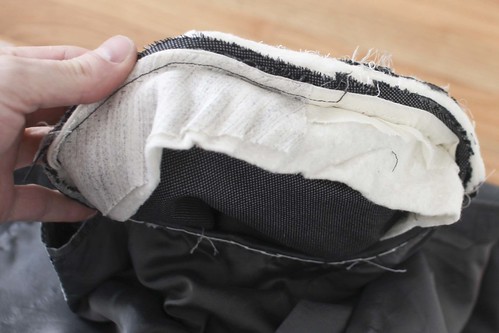
The sleeve head wadding is of the Kotex type, but this has not disintegrated at all. In addition, a single, bias-cut piece of canvas reinforces the front of the sleeve.

Despos07

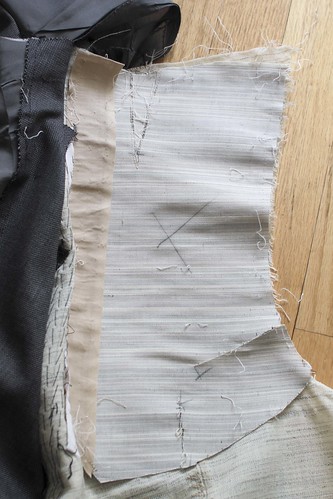
The back of the scye has been stayed with a piece of lining which has been backstitched by hand.
Despos08

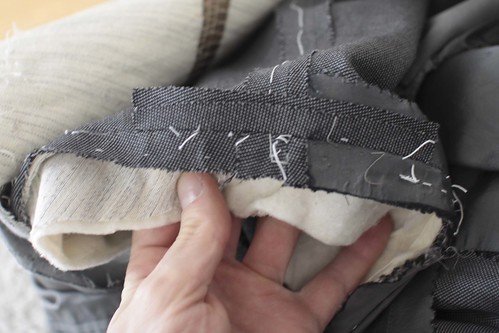
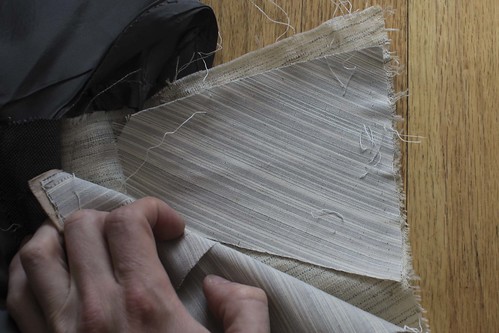
An extra strip of self cloth has been inserted at the cap of the sleeve for smoother pressing.

Despos09

Though it doesn't show in photography, it is worth noting that the sleeves (which are very large, thank you) have been sewn into the (very small) armhole BY MACHINE. The shoulder seam has likewise been sewn BY MACHINE. I don't think that these two steps need to be done by hand, and here is an indication that neither does Despos (nor does Henry Poole, for that matter). His opinion on the matter may since have changed and if it has, I am sure he will share it with us.

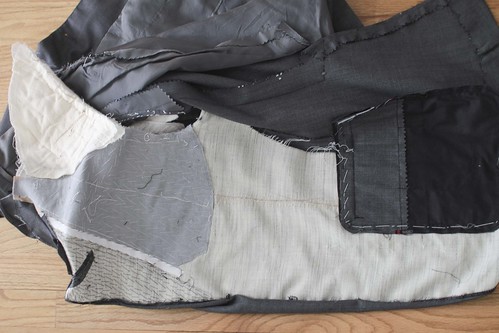
A full view of the coat front shows that his chest piece is of a moderate size, and has been worked up by hand.

Despos10

A closer look shows some of the cuts required to shape the shoulder.

Despos11

And now for a better look at what I mean about this shoulder shaping.

The pocket that has been created for the shoulder bone is very obvious here. This room is very important to the comfort of the garment- garments whose weight sits on the shoulder point are uncomfortable and don't move as well with the wearer. For this reason, shoulder seams which angle backward (and thus make it more difficult to get this forward pitch of the shoulder) are counter-productive, in my opinion.

Despos12

Even after 20 years, this shoulder has maintained its shape.

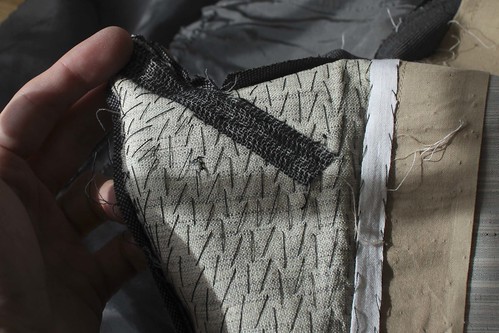
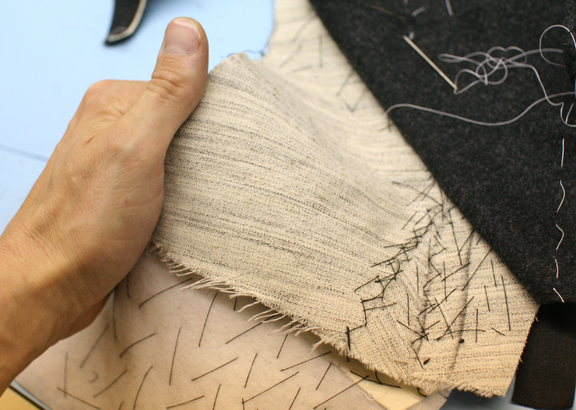
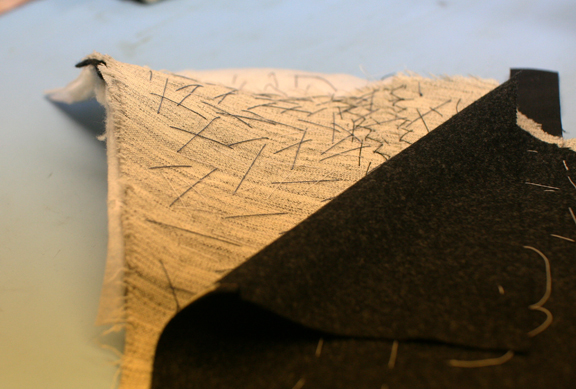
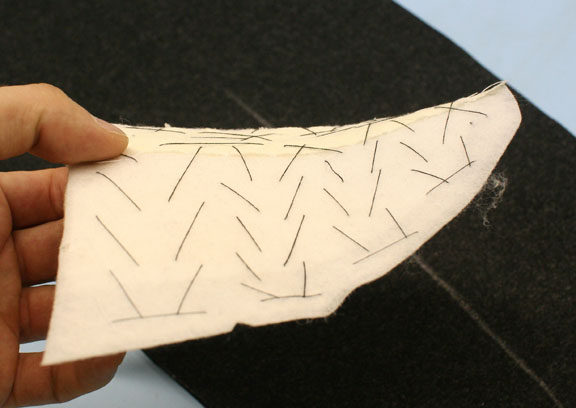
Inside the chest we see the various cuts in the haircloth which build shape, and a strip of beige silesia covering the roll portion to prevent the hair sticking through.

Despos13

A bias-cut shoulder piece is found, as expected, but somewhat unexpected is the hairline; I am more accustomed to seeing it running up toward the outside of the shoulder, but whatever works...

Despos14

A piece of weft-insertion fusible is used to stabilize the bias grain of the peak lapel.
Despos15


The lapel itself feels a little meatier than I expected so I rip some of the padstitching to have a look underneath. Sure enough, more weft-insertion under the lapel to give more volume to the roll.

Despos16

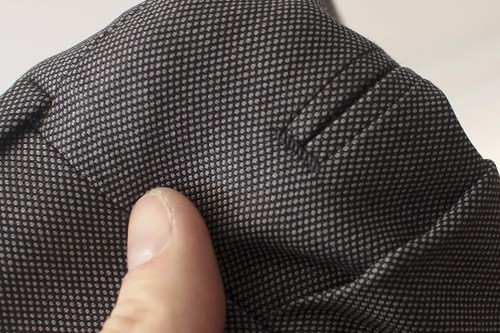
I won't dwell too long on the pants, other than to say their execution is some of the neatest I've seen from the many examples of bespoke work. A few details of note, though, are the buttonhole-stitch bartacks at the end of the pockets,

Despos17

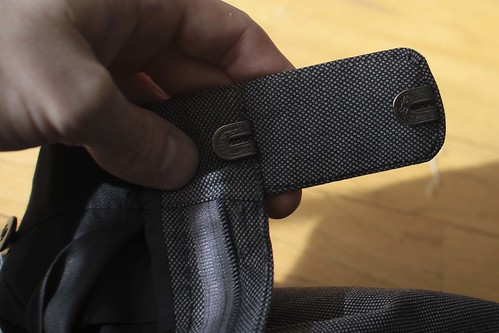
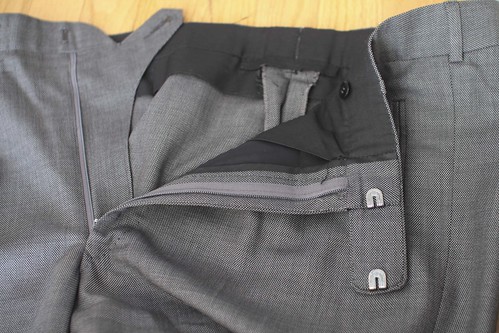
Waistband extensions are more commonly square, as they are much easier to finish than the rounded type, as this one which requires much more work and precision.

Despos18

Despos19


My general impression is that this garment is neater than the majority of examples I have seen from Saville Row houses, and in many instances, more care has been given in its execution. More work went into this garment than the Caraceni that we saw, and the house is legendary. So while the name may not carry the same appeal or cachet than some of the other, more famous houses, the level of workmanship takes a backseat to none of them.

EDIT- disambiguation. There are a number of different results when googling Despos, so to be clear, this is Chris Despos, who is located at 34 East Oak Street, Chicago, Illinois- contact me for the phone number or email address if you need it.

StumbleUpon.com

Monday, October 5, 2009

Pagoda shoulders- putting the pieces together

We’ve seen the shaping that goes into the canvas. We’ve seen the shaping that goes into the pad. Everything that was done to these bits has to be done to the cloth too, but we don’t have the luxury of cuts or darts to impart the shape. This is the part that freaks out some novices, and the thing that makes this kind of shoulder really bad news for factories.

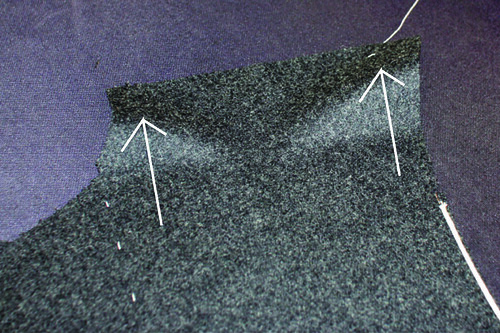
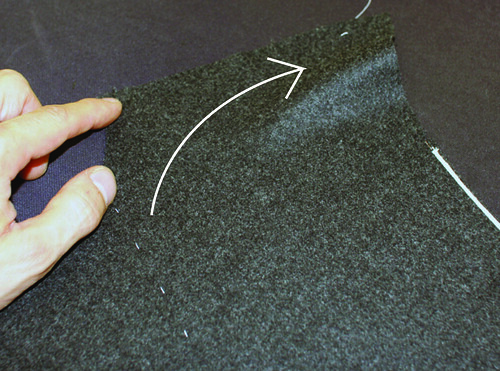
To get the kind of forward pitch and concavity, the neck area has to be stretched (think about the little wedge inserted in the perk) and the scye has to be stretched. How much? Well, that’s a tough one to answer. Enough. Not too much. Start by stretching the neck area, about ¼ to 3/8”, then do the same at the scye area. This should give two distinct ripples of length and a hollow area near the center. Look familiar? It should. Once they have been stretched with the iron, work the fullness toward the shoulder and give the neck another press to set it; the shape must match that of the canvas.

Print
Print
The thing is, when you are stretching all this, you are lengthening the front a bit and thus throwing the balance slightly which will be adjusted during a fitting; you are also changing the scye measurement so the sleeve has to be adjusted accordingly, and refitted by basting, checking, adjusting, rebasting…… just the sort of thing that is anathema to a factory. That’s why you almost never see this type of shoulder except on the highest-end RTW.

So once you are ready to baste the front to the canvas, the first line of basting starts with a little pinch of fullness at the top- it is crucial that there be enough length for the cloth to be worked over the shoulder- if it is tight, the shoulder will kick backwards a bit.

bubble

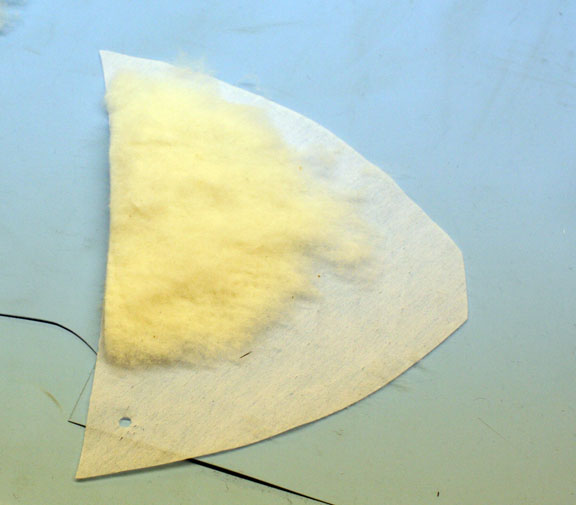
Once the front is basted to the canvas, place the pad in position, flat on a table, lining up the shoulder seams. Baste in a semi-circle along the outer edge of the pad.

first baste

Now reach under and give the pad a yank- this will open up the cut we made in the chest piece, and give the concavity we want. Holding this shape, pad stitch through all layers from the outer edge of the pad toward the top of the shoulder. Keep this shape carefully because by pad stitching we are permanently setting the shape, the same was the lapel is rolled using the pad stitch.

pad stitch

When it’s finished, you will have the concavity of the pagoda shape and the natural forward pitch of the shoulder.

finished inserted

Still with us, Karen?

StumbleUpon.com

Friday, October 2, 2009

Pagoda shoulders- making the pad

In this step we will make the shoulder pad for our pagoda shoulder, and this is where we start to see the beauty of the contours of this shoulder come to life.

SADDLE


Shoulder pads are another controversial subject mainly due to the excesses of the eighties but they can play an important role. The high, square-shouldered figure should avoid them, while the sloping-shouldered figure will benefit from a bit of enhancement (the wonder-bra for the male shoulder). Whether you choose to wad the pad or not is up to you, but a cover at least should always be inserted; if nothing else, it protects the back of the shoulder from stretching while it is on a hanger.

My choice, for my body, is to pad the back of the shoulder, since the slope is considerable, and there is a hollow produced as the shoulder curves forward, away from the blade. A lot of manipulation goes into creating a pocket for the blade and to shortening the back scye, but the area could usually benefit from a little wadding to clean it up; most customers are unaware of the appearance of the back of the scye, not being in the habit of checking 3-way mirrors regularly, but most people could use at least a little bit. Keep in mind that the space we are creating in the front of the shoulder is for comfort and should not be stuffed full of cotton either.

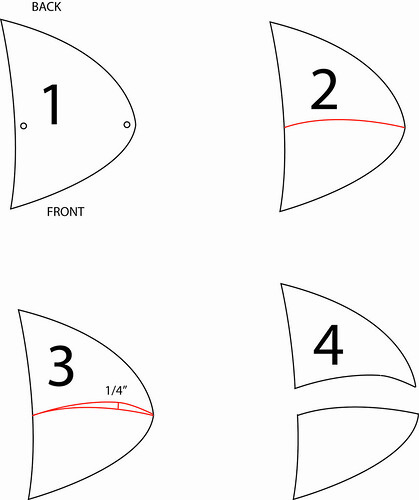
The easiest way to make a good pad is to take apart a commercial one, which is usually pretty straight. There are often holes or notches on the pad to help you locate the approximate shoulder seam location, but you can also tell from the shape- the front being smaller than the back. Take the pad apart completely, then along the center of the pad, draw an arc from one end to the other, approximating the forward curve of the shoulder; one third from the neck on this line, draw up a line ¼” long- this can be longer or shorter, depending on the amount of shape you want. ¼” is usually plenty. Cut the top of the pad part along these lines (if there is a canvas piece under the cover and about the wadding, cut this piece as well).

Print

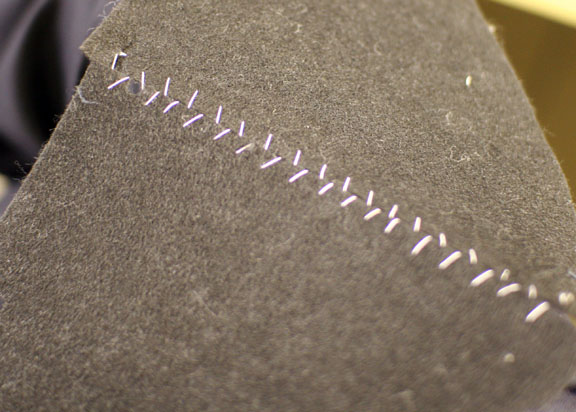
Using a feather stitch (some call it a baseball stitch), join the two cover pieces (if there was a canvas piece, baste it to the underside of the cover and stitch all layers together).

FEATHER

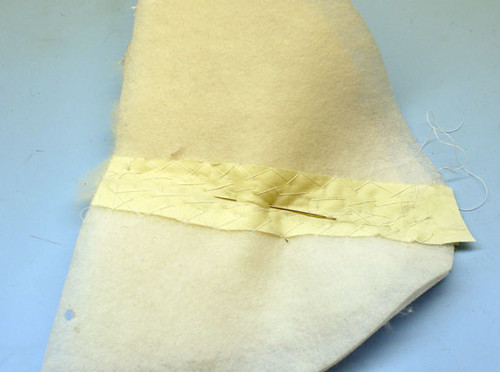
Cut a bias strip of pocketing and pad stitch it through all layers to cover the seam, cross stitch the edges flat.

TAPED

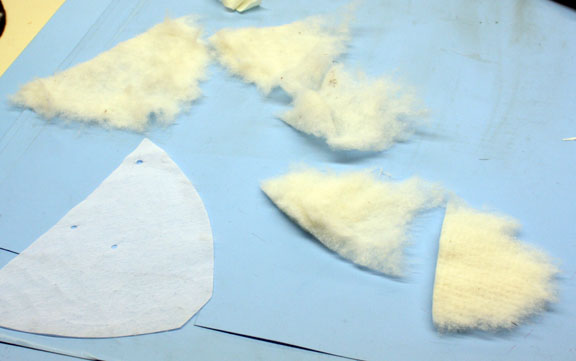
Separate all the wadding that was in the pad.

WADDING

Build up the wadding with thin layers, according to the amount that you want; do not feel the need to use all the wadding- a little goes a long way. Note that the wadding for my pad is concentrated at the back.

WADDING2

Place the cover over the wadding and baste down the center with a long, loose running stitch

RUNNING

Now the shaping.

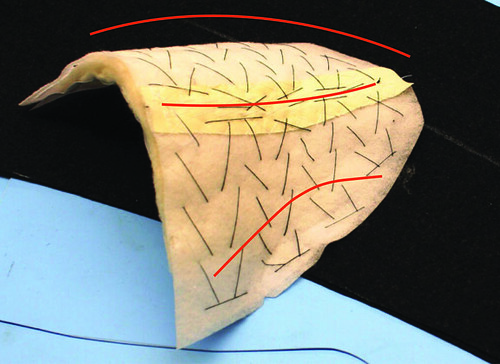
Keep the shape of the shoulder in mind as you pad stitch with fairly loose stitches to prevent lumpiness. There should be an upward curve when looked at from head on, but there should also be a concave curve in the front (curving toward the front) and a convex curve in the back, following the shape of the shoulder. You may need to give a little tug to the front edge, stretching the curve a bit, to get the right amount of concavity. If you do not hold the shape in like this as you are pad stitching the result will not be satisfactory; as you take each stitch make sure you are molding the pad into the desired shape. If at the end the shape does not look right, take it apart and do it again. It will be worth the effort.


Print


EDIT

Jordan makes a good point which I should have mentioned. If you are dealing with a low shoulder (and we usually are) and are making pads, it is far better to pad the low shoulder more than the higher one; it will make matching checks a little easier but, more importantly, will even out the appearance of the customer. Perkins devices were common for measuring shoulder inclination, but they are all but impossible to find now. Instead, grab one of the clinometer apps for the Iphone and turn your phone into a Perkins device.

StumbleUpon.com

Wednesday, September 30, 2009

Constructing the pagoda shoulder, part 1

Preparing the canvas

The shoulder is arguably the most discussed and the most controversial element of a tailored jacket; the whole garment hangs from the shoulder, and the shoulder receives much of the strain from movement. There are perhaps as many ways of constructing, or “expressing” a shoulder as there are tailors, but there area few general shapes, or silhouettes. Some of the names have become muddled throughout the years, but I am going to chiefly examine one of them. Known as the “spalla insellata” because of its resemblance to a horse saddle, it is also known as a “spalla incavata” (concave shoulder) or pagoda shoulder, for obvious reasons. In the 30s the Apparel Arts referred to a natural shoulder as having a concave line, not the round one most often referred to today as a natural shoulder. To understand why, we look at the human shoulder (well, a plastic one. This is a family show, after all)

Web

It is clear that the shoulder line between the trapezius and the acromion forms a concave curve; the front of the shoulder area is more complex due to the curvature of the clavicle and the protrusion of the top of the humerus, the ball which fits into the socket of the shoulder joint. It is this joint which is all important here, because this is where the whole arm moves.

Observing all these hills and valleys we can appreciate the complexity of the shape of the front of the shoulder and perhaps understand why the shape and location of the shoulder seam is crucial to this area. The closer the seam comes to all these curves, the easier it will be to accurately contour them. It was once fashionable to slant the shoulder seam backward which was a way of introducing some fullness over the shoulder blade, much like the vault dart or shoulder dart; the yoke of the shirt conceals one of these darts, and on heavier figures they are often included on the scye or the shoulder seam. In my posting on the one piece back, we saw how the gentle curve of the blade could be accounted for with a bit of stretching, shrinking, and a bit of wadding (shoulder pad) to fill in the hollow, rendering a backward slant unnecessary. It can also have some unfortunate results should the garment encounter humidity and the fullness puff up, unsupported by the shoulder.
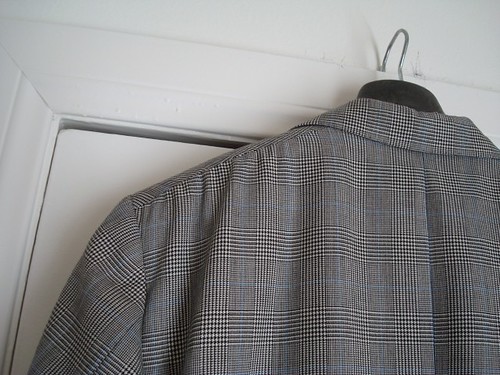
a&s steamed

For these, and a few other reasons, the backward slant is generally only seen on garments from a few houses who like to maintain tradition and who may not have taken the time to fully examine its implications, feeling secure in the received wisdom without questioning it.

Going back to this complex formation, the astute pattern maker will recognize that, not only is the shoulder seam location important, but another seam or dart, or perhaps several, would be appropriate, even necessary. Throughout published literature, tailors have illustrated ways in which these additional shaping mechanisms could be introduced to the canvas, with three principle variations. These two seem the most logical;
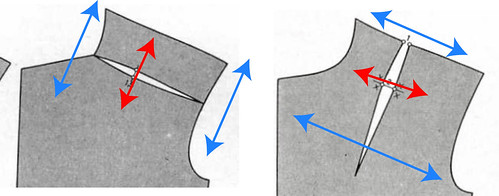
Web

Darts like this will introduce shortness in some areas and length in others, shortness being indicated by the red arrow, and length being indicated by the blue arrows. The first example makes sense, but it introduces some length to the neck area, which, in my opinion, is asking for trouble as extra length may give trouble in the form of a collar lifting from the neck. It also introduces a great weakness in the canvas along that seam by cutting through the hair line. Any shaping of the outer canvas must be carried through all layers and it may be difficult to maintain this shape while providing support.

The second example is also valid, but introduces fullness to the chest, which is fine in a draped style but perhaps not so for cleaner cut chests. It also creates weakness in this area, though it would be easier to make up for this with haircloth.

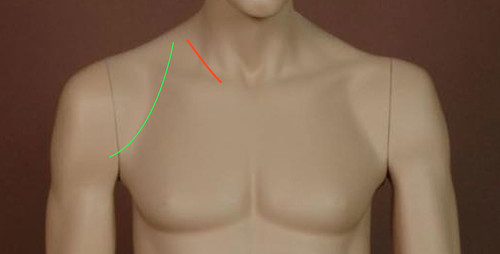
Another look at the shoulder anatomy suggests that neither of these is the best location of the cuts or seams- the ideal location and slant are indicated by the red and green lines.
Web

The third example is the one generally seen today, though the illustration is somewhat incomplete and inaccurate.
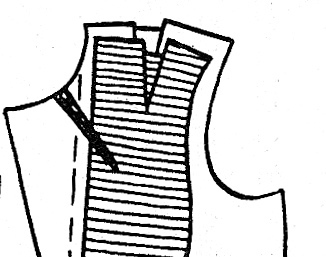
Canvas_Concave_Vee

The cuts, or vees, should correspond with the hollow indicated by the red line in the photo of mannequin just above. These will throw fullness over the shoulder point and create the little hollow and bulge, but as we saw in the soft shouldered coat, this alone will not create the pagoda shape. Most modern coats have these vees to give some forward pitch without creating fullness at the neck or over the chest. To get the pagoda shape, a few more cuts and manipulations are required.

As we look at my way of constructing this shoulder, rather than a slavish adherence to any formulae I may suggest, try to understand the concept behind it so you can adjust to suit your taste or figure, or to work out a totally different shape of your own.

Start with a cut about 3” deep, 1/3” of the way across the shoulder, with an inclination similar to the little red line on the mannequin. Using a bias piece of canvas, open this cut 5/8” to ¾”. When I cut my bias strip, I make a step the width of the desired opening to act as a guide. This will stick out the top but I will trim it off after.
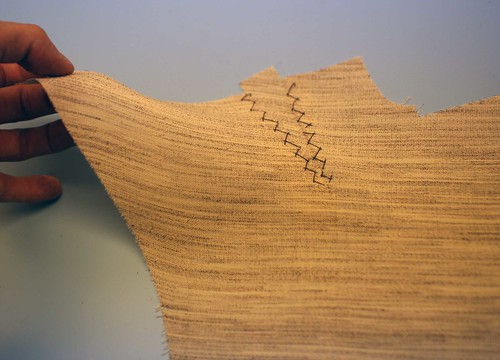
pitch

This will provide forward pitch but to get the complete shape, a little stretching will be required along the armsye. Normally I leave it off to the end of the canvas construction, but to give an idea of the final shape, I have done it first.

stretch

Observe the hairline of the canvas, how it bows upward. The combination of the cut and the stretching create the same effect as the two cuts illustrated in the first diagram, combined, creating length along the shoulder and the armscye, but keeping both the chest and the neck edge short.

To cut the haircloth piece, strike a line along the straight grain of your canvas about 10” long to measure the inclination of the roll line. Let’s say that the short arm of this angle is 3”. Draw a straight line down the center of the haircloth long enough to extend from the shoulder to the desired length of the chest piece (another subject entirely), use the measurement obtained from the canvas, 10” by 3”, to draw the angle of the roll line, and cut along this line. Place the hair cloth pieces together along the roll lines, line up the canvas roll line with the cut edge and draw in the rough shape of the shoulder seam and the first cut location as well as the scye shape, then rough cut the chest piece, which will later be trimmed to fit the canvas more accurately.
roll

It is vital that all shaping remain constant through all layers, but if all the cuts occur in the same place, there will be structural weakness and thickness which is not good. Treating the cuts as darts, which can be transferred anywhere around their apex (a subject covered at great length in regular patternmaking courses so I won’t go too much into here) the cut of the haircloth should be pivoted slightly so as not to occur in the exact same place as the canvas cut. A cut is then also required is in the scye area as show, since the stretching we will do on the canvas is difficult to achieve properly in haircloth. We will open the cut of the haircloth in the same manner as the canvas, but leave the armscye cut open. For now.

chest

Using the haircloth piece as a guide, we will cut what we call the perk, or shoulder support piece, also out of haircloth. This piece is very important to a clean shoulder and should not be cut on the straight grain but on the bias. Some makers prefer a perfect bias, I prefer a partial bias; this bias not only supports the hollow created in the shoulder shown by the diagonal green line above, but also makes stretching easier. To get my grain line, I measure an angle 3” long and then 1” toward the neck point, then join the points for my new grain line. Use the chest piece as a pattern, using this new grain line. The perk should stop about 1” below the cut on the chest piece, and should go straight across. In the image I have drawn in the hairline, not the grainline, so you can see how the perk will support the area.

perk1

Trim the perk so that it is about 3/8” inside the roll line and shoulder edges to avoid thick ridges. Halfway down the roll line portion of the perk, make a horizontal cut which will almost reach the shoulder cut of the chest piece. Instead of using a bias strip on this portion, we will use the chest piece as an anchor to open up the cut, but only 3/8” this time. Notice how all the cuts radiate around the same point? This is extremely important to get everything to gel together correctly when finished. Notice also how there is some weakness which creates a ripple of length along the roll line? This will be privoted toward the shoulder soon.

perk fixed

Now baste the chest piece on to the canvas, being sure to keep the roll line straight, which will force all the length created by the cuts over to the shoulder point. VERY IMPORTANT.

chest1
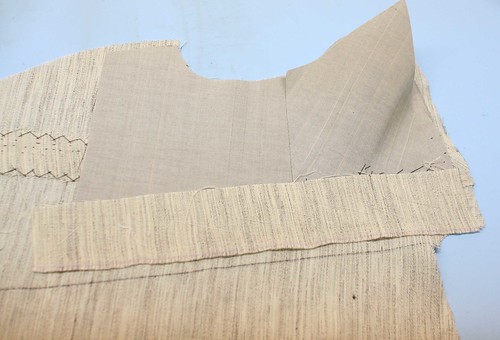
A straight cut piece of canvas should be used to cover the front edge of the chest piece, where the hair often pokes through and bothers the wearer; this will also help to stabilize the roll line and keep the length over the shoulder. You may want to use a strip of pocketing to cover the lower edge of the chest piece to prevent poking through as well.
chest2

Despite the staggered cuts, the canvas should be coming together like this, with all the shaping being sent toward the shoulder point.

sh

Place a piece of felt, flannel or domette as you like, and pad stitch the canvas the way you normally would (another subject) but leaving the shoulder free. Make sure to keep the area around the neck straight, and pad this area a little more heavily to stabilize that weakness in the perk we saw earlier. It is now that we should use the iron to stretch the armsye area; the canvas will stretch, the perk will stretch a bit but will also shift, and the scye cut in the chest piece will open up, but still be loose. Commercial canvas front makers like Interforme have big pressing machines which have shapes which support the chest while stretching the shoulder all in one shot. Once we have basted the canvas to the front and inserted the shoulder pad, we will then pad stitch through all those layers- the cut will be open but supported by the perk underneath which is longer for that reason and the shape will be fairly permanent and won’t “break down” with time. Ahem.
padcanvas

Now the canvas goes in water overnight (never never never skip this step, no matter what canvas makers say about being preshrunk) and while it is soaking and drying we can make the shoulder pad. The canvas will get a torough pressing when it dries out, and another little stretch in the scye. And now I wait for the flannel to arrive so I can cut the cloth. EDIT** CLOTH JUST CAME!*** But while we wait, go back to the posting on the canvas for the soft shoulder- one pice of canvas, one little cut. That's it. Compare the two, knowing we have only completed the first of several steps; some people contend that the soft shoulder is the greater art form. I beg to differ.

And meanwhile an amusing little article about Bill Fioravanti, who also favors the concave shoulder. I have never met him, but Chris Despos has only good words for him, and if I am not mistaken, called him one of the best fitters he knows. High praise indeed!

In response to Dukemati's question, my canvas and haircloth are both from Rovagnati Vincenzo spa; the canvas is the lana 180g (sometimes I use 200g) and the chest piece is made from 21 pick haircloth- nice, light and resilient. If you are in North America, their distributor is Interforme Interlinings, esturino at interforme dot com; Emilio Rovagnati will be here next week, I will ask him about worldwide distributors.

StumbleUpon.com

Saturday, September 12, 2009

More on Pagoda Shoulders

Karen asks about how to construct a pagoda shoulder, but first, a bit of background. Initially known as a "natural" shoulder as it followed the natural curved formed by the hollow between the clavicle and the acromion, the term has been appropriated to denote the round, sloped shoulder seen on Ivy League suits of type sold by Brooks Brothers, Southwick, Paul Stuart, and the like.

If we no longer see the pagoda shoulder very often, it is likely because it is, in my opinion, the most complex to construct and requires specific handling of the wadding, if any, in the shoulder; the canvas construction supporting the shoulder requires some extra work, and a careful manipulation of the cloth to give not only the concave shape we see when seeing it head-on but, more importantly, the distinct forward pitch of the shoulder. Some tailors who like a rounder shoulder seek to preserve what little elasticity is present in the shoulder area; my preference is instead to follow the actual contours of the body in order to create comfort and avoid pressure on the shoulder points, distributing the weight of the coat across the trapezius instead. So all this pagoda business is really more about comfort than aesthetics, but it can also appeal to some.

Enough blathering.

This will require a series of posts, as first, the cloth requires some ironwork without which we will never achieve the correct three-dimensional shape out of a flat piece of cloth (see post on trouser ironwork if you're not familiar with the concept).

We need a series of "fishes" or "wedges" (reverse darts) and cuts in the canvas underneath, then some careful pad stitching.

We will look at making a shoulder pad for those, like me, who need a bit of help.

Then, instead of waiting until the shoulder has been joined to add the pad, we will attach it to the canvas after basting the canvas to the front. This step is crucial to the final shape of the shoulder.

I suppose I'm going to have to make myself another suit. :)

StumbleUpon.com

Friday, September 11, 2009

Another suit completed

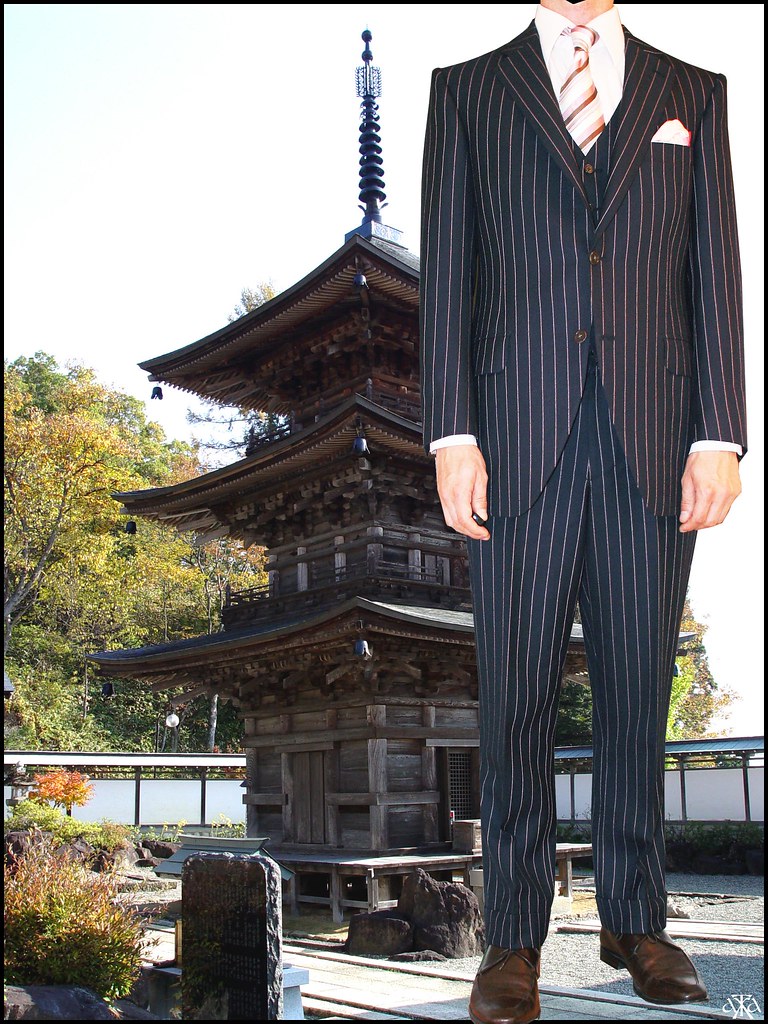
I don't know why I have always hated the term "pagoda shoulders", but I do. Spalla insellata sounds a little better if you speak Italian but sounds pretentious to those who don't. Well, whatever.

pagodas

But to something more important. I think that the survival of our craft depends not only on the propagation of the technique but also the survival of our suppliers. It's getting harder and harder to find the necessary stuff for making nice suits so when I find someone who makes it just a little easier I like to support them. I normally buy cloth in large quantities from the Italian mills, but when I want to cut something special, they aren't very helpful. Enter people like Andrew Rogers, from whom you can buy half a meter of Fox, Minnis or Harrisons cloth if you want; we need to keep people like this in business. So if you like the cloth I used for my suit, check out his stuff here or at britishclothsales@gmail.com; he offers good service. And tell him I sent you.
StumbleUpon.com