I've been asked about my buttonholes a few times, mainly by people wanting to know how to do them. There's a good set of printed instructions here but I have a few things to add to it.
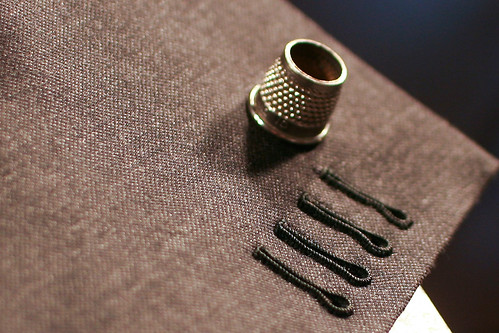
The type of cloth will dictate how narrow a bite you can take- loose cloth requires a wider bite, tight cloth you can get away with a narrower bite. It makes a difference in the appearance. Consider the buttonholes at the top of the post- they have a raised appearance like the Milanese buttonhole. The buttonholes below appear much flatter.
What is the difference? They were all made with the same size silk twist, the same gimp, using the same stitch type, and by the same person (me). To get the flat buttonhole, I take a fairly wide stitch so that the gimp sits under the leg of the stitch and the knot sits to the side of it. For the raised buttonhole, I take a much narrower stitch and pull straight up when making the knot in order to place the knot directly on top of the gimp. This gives the volume. I filmed the making of the grey sleeve shown above; I'm not sure if anything will be visible in the internet-friendly version, but let's give it a shot.
EDIT- Apparently some browsers only display half the video screen, so by clicking on the title of the video (Hand Made Buttonholes) you can go to the vimeo site where you should be able to see it complete. In the meantime I will try to figure this thing out..... still more technical problems. If you get jagged lines, try clicking through the full res version on Vimeo- I think that works better.
Those who are interested in the materials used can check out this blog post where I discussed the various threads http://tuttofattoamano.blogspot.com/2009/12/hand-made-buttonholes.html
Unfortunately, I don't know where to get the Agreman gimp online. Richard James Weldon stocks it in London, Lafayette Saltiel Drapiers stocks it in Paris and sells the black by the meter rather than by the spool, you could try calling Bergen Tailor Supply, B. Black or Ely Yawitz- they may stock it even if it's not on their websites. Next time I see my Gutermann rep I will ask if he knows of anybody who stocks it, but I doubt he will know.
Hand Made Buttonholes from Jeffery D on Vimeo.


34 comments:
Are the buttonholes in the second photo that appear flatter than the raised buttonholes in the first photo really flatter or is it because of the angle of the camera? Both sets of buttonholes are splendid.
So is the musical accompaniment in the video while you work sitting like a tailor. Was the cellist Rostropovich? Gr-reat music while you toil away.
JMB
Great video, Jeffery ! There are lots of explanations on the web about the stitch, but really few on the movement.
And your buttonholes are still amazing...
Cheers,
Nishijin.
THanks!
The grey buttonholes really are more raised than the gold ones. You can just see the gimp peeking through the leg of each stitch on the flat ones, whereas it is completely covered in the grey ones.
Really, Jordan, snoozing again? :) There is a credit at the end of the clip- Pablo Casals was playing. It reminds me of my grandfather who was also a cellist.
J
That's really interesting. Thanks.
Jeffery, you're wonderful. Thank you.
Me, snoozing? Nahh!
So it was Casals. Wonderful musician! Terrific choice
for the soundtrack of the video. By the way, if you haven't heard the pianist Marc-Andre Hamelin, there's a recording of the Schumann Piano Quintet with the Montreal-born pianist and the Takacs Quartet on Hyperion that is a knockout! I'm not sure
what would best 'suit' Hamelin on one of your videos. Guess I've have to sleep on it.
JMB
Merci beaucoup, Both the music and your work are awesome
Nice holes, J.
- B
Could you please let me know the ID of the brown cloth in the first picture? I very much like this one! Many thanks in advance.
The first picture is actually grey (LBD fine classics)- do you mean the check? If so, it's a cloth from Reda, an Italian mill, from their SS09 line.
Hi Jeffery.- Finally I can see the video. My player was very slow. Thanks for showing. ahhh, I love the music of Pau Casals, Catalan great musician. Greetings to you, Paco.
Very useful demo. Thanks for the effort.
If you don't mind, I'll make two observations about the video. In HD, I was seeing jaggy horizontal lines -- a byproduct of interlacing. Vimeo suggests deinterlacing the video, if your software allows it. There are also apparently free programs that just do that.
http://vimeo.com/help/compression
Also near the end, the iris is opening and closing a lot as your hand comes in and out of the shot. If your camera can do it, you can set it to manual iris and it'll produce a better shot.
Just some suggestions. I'm sure we'd all appreciate more videos. Thanks,
Thanks Jeff! Absolutely wonderful.
Sewsy
Thank you. That was very informative.
I will NEVER sew buttons by machine again! Thanks for this wonderful video. I have a bunch of silk buttonhole thread I have been saving - I knew I would need it some day. Where does one buy gimp?
PS I use the same thimble for hand embroidery. I also have a brass one that's half open on top. It sort of looks like it has been half opened with a can opener and folded back - that part makes a cutter. I don't use the cutter, but the thimble is a little larger than other and is super comfy. ~Page
hello! what are the threads to use for the hand made buttons? im so confused with all the threads in the b. black and sons online shop. can you help me ? and what are the best brands to use for this. thanks!
http://www.bblackandsons.com/sewing-supplies-thread-c-68_80_107.html?page=1&sort=20a
Thanks for all your comments!
Brian- thanks for the tips, I will look into those.
For those who are interested in the materials, check out my previous post on the subject here
http://tuttofattoamano.blogspot.com/2009/12/hand-made-buttonholes.html
best
J
wow! thanks for the info on the materials! very informative. anyway do you know where to buy agreman gimp online? thanks!
GREAT BLOG!
Thank you for this. Nothing replaces watching the technique done by someone who knows what they are doing with a needle! I have to make about 100 hand buttonholes in the next few weeks, in 1800's reproductions, so this is very timely and appreciated!
beautiful!
great video, not sure I can do it myself yet. But I wouldn't mind giving it a try with the lapel. However I think the video will be even better if we can see your skilled hands closeup and slowing down with a few reps. Also it will be even better if you can do it on a white cloth so we can see your progress on the hole with a contrasting thread.
I wanted to mention the two places of in the US where Agreman Gutermann gimp is available, because I recently purchased some. B. Black and Sons, and Ely Yawitz both carry it, just not on the website. If you call them up you can order it. I ordered mine through B. Black and got it the next day quick and easy. Hope that helps. :)
wow, I haven't see the demo yet but these are the most beautiful buttonhole I've ever seen! I live in Berlin and it's hard to find a good place to gett buttonholes (I used to live in NYC and they are easier to find and cheaper). I decided to practice making my own, Thanks!
daniel
www.zierfisch-mode.com
one comment, that i don't see above. i really wish you had a full downward view in the video, when you cut the buttonhole with the chisel. instead, the fabric of the rest of the sleeve is "in the way" of our view. that's the scariest part of doing these, in my view. what happens if i don't do it right? i will have ruined an entire sleeve (or the front of a coat/jacket/waistcoat) if i screw up that cut.
Step one: find several pieces of different-fineness of suiting/coat fabrics
Step two: in each fabric, mock-up the end of a sleeve, the front of a jacket, etc. with the correct thickness of interfacing, interlining, etc.
Step three: practice LOTS of buttonholes, on lots of fabrics, before cutting into anything REAL with that sharp chisel
As my grandma said: Practice makes perfect!
[This reminds me of the Beatrix Potter book "The Tailor of Gloucester", in which the tailor runs out of cherry twist (buttonhole silk) and the mice finish off the last buttonhole of the waistcoat, overnight. "No more twist!"]
I have what is probably a very stupid question. Watching your video closely, it appears that you're wrapping the thread up and over the tip of the needle in a clockwise direction, in the direction you're working. Looking at all of the the printed information you've provided, it seems that there's an alternate method where one wraps the working thread counter-clockwise. Am I seeing this incorrectly? Your buttonholes are just beautiful, but I'm confused as to which is the best method to use. The counter-clockwise wrap produces a purl at the lip which is quite pronounced; the clockwise wrap produces a smaller, mor subtle purl. I could this all wrong though. Any comments would be much appreciated.
Noel-
You must be reading the instructions wrong. To be sure I just grabbed a needle and some twist and worked a few stitches each way- working clockwise makes a purl, working counter-clockwise makes a blanket stitch.
J
I figured as much. Thanks so much for your patience. Back to practicing, practicing, practicing. I'll get there eventually!
Oh Jeffery,
Your buttonholes are to absolutely die for and I am practising...........would you have the patience to explain your technique......
I have read through the notes and so I am pulling up straight as you do in the video, and then following the other attachments, pulling towards me and then away.........do I then do the left and right to set the stitch. I am struggling to ensure that I get the purl in the right place and not so that it slips over the edge. I so want to do your video justice and complete a beautiful buttonhole.
You have set the bar incredibly high, and I think all of us want to reach such excellence as you!
Just found your buttonhole video. I think your work is gorgeous. I've been sewing almost 50 yrs. and now need to learn to do a handmade buttonhole. I hope mine will look half as good as yours.
Dear Jeffery,
Very nice craftsmanship. Buttonholes look fabulous.
Would you be so kind and tell me where I could buy that silk thread and the thimble you use. Am looking for it for ages. It has to be curved and inlayed with brass. I see your is made in England. Had one made in Germany but it got lost.
Kind regards,
Marko
Thanks Jeffery - you're an inspiration as always! Agreman gimp is sold online by Wawak Sewing Supplies NY. They have very competitive pricing. I use Seta Bozzolo for the twist from Tristan in Richmond BC. They are wonderful to deal with and that thread handles beautifully.
http://www.wawak.com/products/search.cfm?KEYS=gimp&x=0&y=0
Dear Jeffrey,
You post inspired me to make my own buttonholes. I have a question. May I know what size needle you are using? Thank you so much!!
Mimi
Beautifull and very old school. This is how we learn it in the old days.
Post a Comment