There were a number of questions about the vent finishing on the Ralph Lauren Purple Label garment, so here is a look at it again, with a comparison to an engineered method.
The traditional method of finishing the vents has the lining seam follow the shape of the side body, with a hockey-stick-shaped step at the top of the vent.
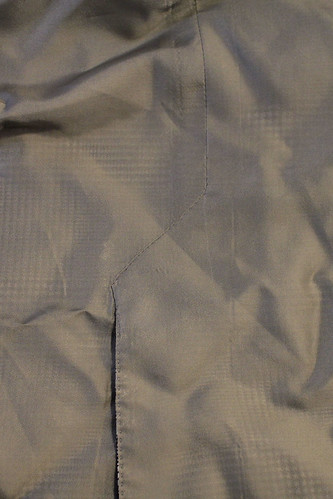
In this case, it has been (exquisitely) finished by hand, however it is possible to do this by machine. So this, in itself, is not a sure indication of the level of construction.
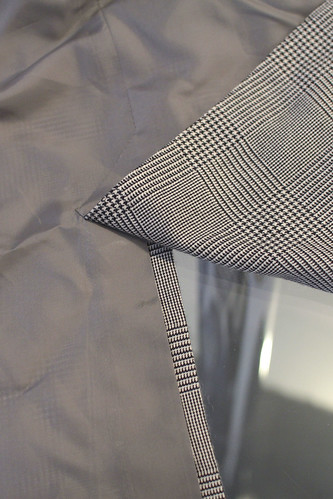
The engineered method pushes the side seam over so that it meets the top of the vent in one straight line, like this one.

When we flip the underlay up, we can see the most telling thing. The engineered vent's lining will continue in a straight line down the vent. This method can be done entirely by machine, no hand finishing is required.

The traditional method has an underlay of lining underneath the cloth underlay- notice how the lining extends closer to the edge of the folded vent.
This kind of application must be slashed, basted, and finished by hand so it's a pretty good sign. I like this method because the lining seam can be tacked to the cloth seam to prevent shifting- the engineered method can't be tacked because the lining seam is offset from the shell seam.
Joanne asked if I knew of any online instructions for vent finishing and unfortunately, I don't.


10 comments:
Re: vents and lining - there's a how to here for a skirt vent that might help: Pencil Skirt Lesson #3 – Back Vent Tutorial Part II, Attaching the Lining :)
I've never thought to look at the inside of vents before. Very interesting. I am happy to see that mine are a "good sign".
That is how I was taught to line a vent, still do it that way. I like it better.
Is the pick stitching on the vent finishing on in the first picture done by hand (like the Smalto and Feruch) or is it done by machine?
Hello,I'm from Russia Moscow.I like what you do.Please, if you know, how to make armhole,succession manufacturing,different methods,shoulder pad,tell me about.All the best.
Kathleen Fasanella's "Nameless" tutorial series shows how to make a back vent with the hockey-stick-shaped step. When the underlap is lifted, it reveals that the lining goes in a straight line like in the engineered sample above. This vent is formed completely by machine. I use it on all my lined, vented skirts and like it quite a bit.
The "Nameless" tutorial series wasn't really about back vents, but the topic fit in nicely, so Kathleen included two parts on it. This link goes to part 5 of the series which discusses the back vent. Sewing instructions are in part 6.
http://www.fashion-incubator.com/archive/nameless_5_back_vent/
Do you find that the stitching when hand felled does always seem to be rather weak in this area ? (in that it breaks quite frequently). On lots of bespoke suits Ive seen it comes away after a while before any other part of the lining. Its probably more to do with the quality of the hand stitching or thread more than anything but Id like to know your thoughts. thank you
Wow. I love you, people! You really know what you are talking about! Thanks! And congrats, Jeffery!
By now I've read all your posts with great interest and I begin to understand how each step should be performed when sewing a jacket. What would be very interesting would be to get a guid that tells the order in which the various operations to be performed. My desire reveals that I am not a tailor but an amateur who has been very inspired by your blog and want to start sewing. The blog has made me understand how to judge the quality of a garment.
Want Air Duct Cleaning Collingwood Ontario, Cora Duct Cleaning is here for you.
Post a Comment